

L-723 Bucking In the Laser
Bucking In the Laser
The Three-Point Buck-In procedure requires adjusting the laser plane to be parallel to the surface being measured; for example, a table top, a surface plate, or a way surface. Three points are required in order to relate one plane to another. Any three points on a surface may be used, however Hamar Laser recommends the setup illustrated in Figure 1.
Setting up the Equipment
Note: Refer to Figure 1 to position the equipment on the surface. Refer to Error! Reference source not found. and Error! Reference source not found. for the location of switches and connections.
- Position and secure the laser.
Position the laser as shown with the arrows forming an “L” and turn the lever on the magnetic base to ON to lock it securely to the metal surface. - Coarse level the laser.
Turn the selector switch on the laser to LASER & SCAN and turn the light switch for the bubble level vials ON. Using the coarse micrometers and observing the position of the bubble levels, coarse level the laser so that the laser plane is approximately parallel to the surface. - Position and secure the target.
Place the target in the Near Position. Move the target in its magnetic base until the laser beam roughly hits the mid-position of the target and turn the lever on the magnetic base to ON to lock it securely to the metal surface.Note: As you move the target to the Near Position, Far Position A and Far Position B, mark where the base of the target sits on the surface so that it may be repositioned in the same place each time. - Set the Readout.
Set the Readout to the .001” scale setting and FAST mode (see Error! Reference source not found.).
Performing the Three-Point Buck-In
Note: Before proceeding, ensure that all the steps described in the section of this user’s guide titled
Setting up the Equipment on Page 1 have been completed.
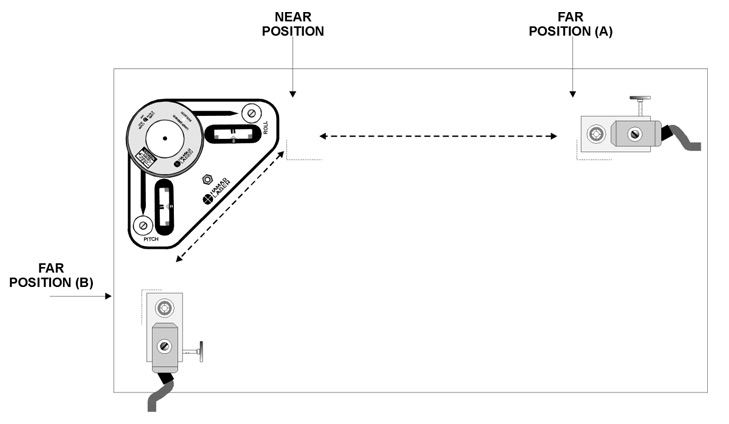
Figure 1 -Three-Point Buck-in (Recommended Setup)
- Center the target in the Near Position.
With the target in the Near Position, adjust the target micrometer until the readout reads zero. - Move the target to Far Position A and tilt the laser beam until the readout reads zero.
With the target in Far Position A, tilt the laser beam with the laser micrometers until the readout reads zero. Be sure to use only the micrometers that face the target (in the setup displayed in Figure 1, this would be the micrometers marked ROLL).Note: When the target is in the Near Position, always use the target micrometer to center the target photo cell. When the target is in a Far Position, always use the laser micrometers to tilt the laser beam. This is easily remembered by the phrase, “Center Near, Tilt Far.” - Repeat Steps 1 and 2 until the readout reads zero with no adjustments.
Continue to move the target between the Near Position and Far Position A and adjust the target and laser micrometers (depending on the target position) until the readout reads zero without adjustments. - Move the target to Far Position B and tilt the laser until the readout reads zero.
Be sure to use only the laser micrometers that face the target when tilting the laser beam (in the setup displayed in Figure 1, this would be the micrometer marked PITCH). - Recheck the readings at the Near Position and at Far Positions A and B and adjust to zero if necessary.
When all readings are zero without adjustment, the laser plane is parallel to the surface.