Troubleshooting Guide L-700
Troubleshooting Guide L-700
| Problem | Possible Solutions | |
|---|---|---|
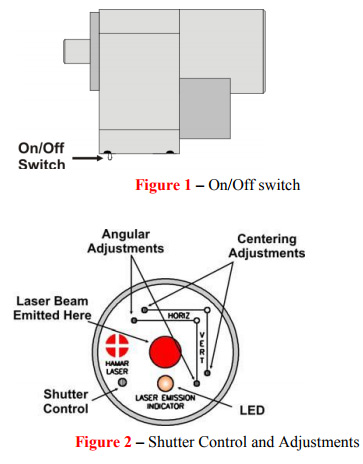
| 1. | No Laser Beam |
|
| 2. | Beam Is Not Round (use white paper to see beam) |
|
| 3. | Beam has satellites (use white paper to see beam) |
|
| 4. | “—“ shown in Software Target Display |
|
| 5. | If green LED on R-358 is illuminated, but there are “—-“ in the display |
|
| 6. | “OFF TGT” Shown in Target Display |
|
| 7. | Numbers in Target Display Jump Wildly |
|
| 8. | Numbers in Target Display are noisy (jump up/down by more than 0.002 mm in 2 meters) |
|
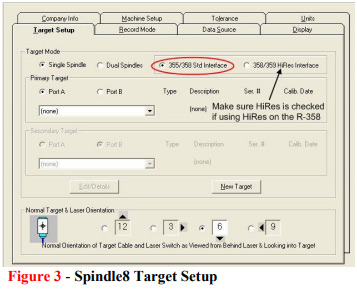
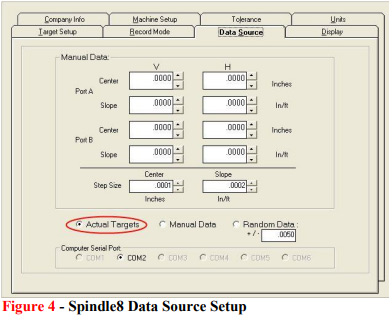
| 9. | Software Crashes upon Loading |
|
| 10. | No Negative (or Positive) readings are displayed |
|
| 11. | Get very odd results |
|
| 12. | R-1307 Readout not visible to Radio Devices | The following is applicable to the R-1307 only:
To make the unit visible to all other radio-enabled devices, you must set the Target Network ID and the System ID for the readout.
|
APPENDIX A – Replacing Batteries in the L-700
Replacing the Batteries
The battery pack uses two 9-volt batteries. The batteries are housed in a two-part case which is held together by flathead screws. Hamar Laser recommends using alkaline or nickel-cadmium (NiCad) cells for best performance.
- Unplug the battery pack from the laser.
Pull the probe out of the laser control panel and gently set aside.
- Unscrew the cover of the pack.
Locate and loosen the two captive flathead screws, and remove the cover.
- Replace the two batteries.
Remove the old batteries and replace them with new 9-volt cells, being careful to orient them with the negative terminal out (or up).
- Re-attach the cover.
Put the cover back on and secure it to the battery pack with the screws.
Configuring the R-1307 Readouts
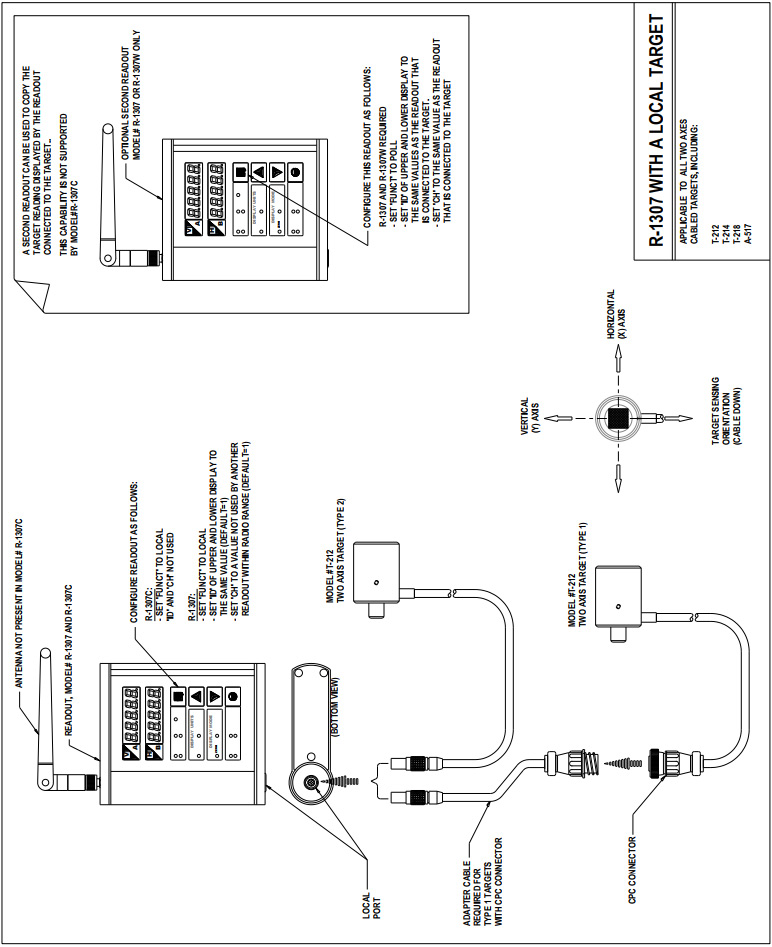
Configuring the R-1307C or R-1307 for a Local Target
Note: Shut off power to the readout before connecting or disconnecting a target from the local port.
- Connect the cabled target to the local port of the readout, as shown in Figure 4.
Refer to Figure 1 or Figure 3 for a description of the control panel buttons and indicator functions applicable to your unit and to Figure 7 for a list of Menu settings. - Set the Measurement Units
Press the MENU button until the upper display shows Use the UP and DOWN arrow keys to select either for inches or for millimeters. - Set the Dampening Level
Press the MENU button until the upper display shows . Use the UP and DOWN arrow keys to set the number of averages. Four (4) is the default setting. Adjust this value as required to suit the application. - Set the Readout Function to Local Target
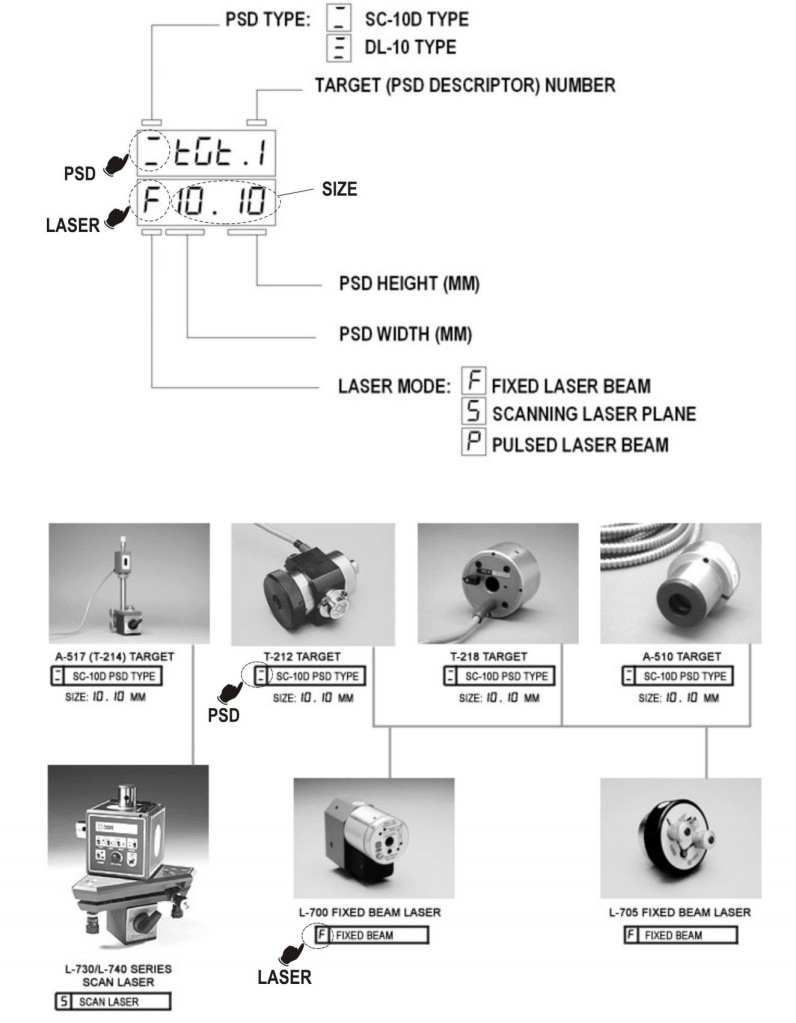
Press the MENU button until the upper display shows . Use the UP and DOWN arrow keys to select . - Select the PSD descriptor applicable to your target.
Press the MENU button until the upper display shows . Use the UP and DOWN arrow keys to select the Target Number. Refer to Figure 7 and the R-1307 Utility for more information regarding PSD descriptors.
The following is applicable to the R-1307 only:
To make the unit visible to all other radio-enabled devices, you must set the Target Network
ID and the System ID for the readout.
- Set the Local Target Network ID
Press the MENU button until the upper display shows with the current Target ID () blinking. Use the UP and DOWN arrow keys to set the Target ID (the default is 01).Press the MENU button again until the lower display shows with the current Target ID () blinking. Use the UP and DOWN arrow keys to set the Target ID to the same value as that of the upper display’s Target ID (the default is 01).The upper display will show the vertical (Y) axis position of the local target. The lower display will show the Horizontal (X) axis position of the local target. - Set the System ID (Radio Channel)
Press the MENU button until the upper display shows , with the current System ID() blinking. Use the UP and DOWN arrow keys to set the System ID (the default is 01).
Configuring the R-1307W or R-1307 as a Master Readout with up to Two Wireless Targets
Note: Refer to Figure 2 for configuring the Readout to display data from one target in dual- axis (fixed beam) mode and Figure 1 for configuring the Readout to display data from two targets in single-axis (scanning beam) mode. Refer to Error! Reference source not found. or Error! Reference source not found. for descriptions of the control panel buttons and indicator function applicable to your unit and to Error! Reference source not found. for a list of Menu settings.
- Set the Measurement Units
Press the MENU button until the upper display shows Use the UP and DOWN arrow keys to select either for inches or for millimeters. - Set the Dampening Level
Press the MENU button until the upper display shows . Use the UP and DOWN arrow keys to set the number of averages. Four (4) is the default setting. Adjust this value as required to suit the application. - Set the Readout Function to Master (poll) mode
Press the MENU button until the upper display shows . Use the UP and DOWN arrow keys to select . - Set the Target Network ID for Target A, upper display
Press the MENU button until the upper display shows with the current Target ID blinking.
• Configure the upper display to show the position of the first scan target (A). Use the UP and DOWN arrow keys to set the Target ID to the TARGET NETWORK ID switch settings of the wireless target.
–or—
• Configure the upper display to show the vertical (Y) axis position of a dual-axis target. Use the UP and DOWN arrow keys to set the Target ID to the TARGET NETWORK ID switch settings of the wireless target. - Set the Target Network ID for Target B, lower display
Press the MENU button until the lower display shows with the current Target ID blinking.
• Configure the lower display to show the position of the second scan target (B). Use the UP and DOWN arrow keys to set the Target ID to the TARGET NETWORK ID switch settings of the second wireless target.
–or—
• Configure the lower display to show the horizontal (X) axis position of a dual-axis target. Use the UP and DOWN arrow keys to set the Target ID to match the TARGET NETWORK ID of Target A. - Set the System ID (Radio Channel)
Press the MENU button until the upper display shows , with the current System ID () blinking. Use the UP and DOWN arrow keys to set the System ID (the default is 01) to match the System ID switch setting common to all wireless targets that are part of a system.
Note: A “system” consists of one master readout, additional readouts in copy (listen) mode and up to two wireless targets. If you intend to use more than one system within radio range of each other, you must set each system to a different System ID (radio channel)
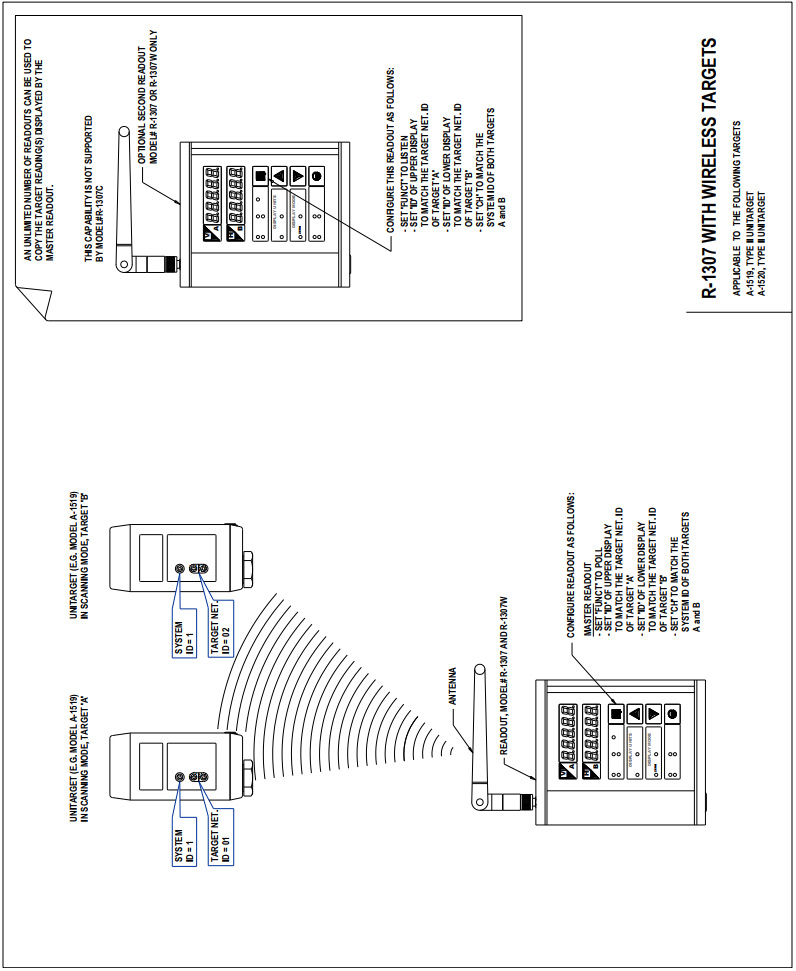
Figure 1 — Using the R-1307 with up to two Unitargets in Single-Axis (scanning) mode
Configuring the R-1307W or R-1307 as a Backup Readout for Wireless Targets
Note: Refer to Error! Reference source not found. or Error! Reference source not found. for descriptions of the control panel buttons and indicator function applicable to your unit and to Error! Reference source not found. for a list of Menu settings.
- Set the Measurement Units to match the settings of the Master Readout
Press the MENU button until the upper display shows Use the UP and DOWN arrow keys to select either for inches or for millimeters. - Set the Dampening Level to match the settings of the Master Readout
Press the MENU button until the upper display shows . Use the UP and DOWN arrow keys to set the number of averages. - Set the Readout Function to Copy (listen) mode
Press the MENU button until the upper display shows . Use the UP and DOWN arrow keys to select . - Set the Target Network ID for the upper and lower displays to match the settings of the Master Readout
Press the MENU button until the upper display shows with the current Target ID blinking. Use the UP and DOWN arrow keys to set the Target ID to match the setting of the upper display ID of the Master Readout.Press the MENU button until the lower display shows with the current Target ID blinking. Use the UP and DOWN arrow keys to set the Target ID to match the setting of the lower display ID of the Master Readout. - Set the System ID (Radio Channel)
Press the MENU button until the upper display shows , with the current channel number () blinking. Use the UP and DOWN arrow keys to set the channel of the Backup Readout to match the channel of the Master Readout.
Notes:
- Readouts configured in this mode will only display data if the Master Readout is present and polling one or more wireless targets.
- Backup Readouts must be within radio range of the targets and the Master Readout.
- There is no limit on the number of Backup Readouts configured to copy data for wireless targets.
Configuring the R-1307W or R-1307 as a Backup Readout to an R-1307 Readout with a Local Target
Note: Refer to Error! Reference source not found. or Error! Reference source not found. for a description of the control panel buttons and indicator functions applicable to your unit and to Error! Reference source not found. for a list of Menu settings.
- Set the Measurement Units to match the settings of the Master Readout
Press the MENU button until the upper display shows Use the UP and DOWN arrow keys to select either for inches or for millimeters. - Set the Dampening Level to match the settings of the Master Readout
Press the MENU button until the upper display shows . Use the UP and DOWN arrow keys to set the number of averages. - Set the Readout Function to Master (poll) mode
Press the MENU button until the upper display shows . Use the UP and DOWN arrow keys to select . - Set the Target Network ID for the upper and lower displays to match the settings of the Master Readout
Press the MENU button until the upper display shows with the current Target ID () blinking. Use the UP and DOWN arrow keys to set the Target ID to match the setting of the upper display ID of the Master Readout. Press the MENU button until the lower display shows with the current Target ID () blinking. Use the UP and DOWN arrow keys to set the Target ID to match the setting of the lower display ID of the Master Readout. - Set the System ID (Radio Channel)
Press the MENU button until the upper display shows , with the current channel number () blinking. Use the UP and DOWN arrow keys to set the channel of the Backup Readout to match the channel of the Master Readout.
Notes:
- Backup Readouts must be within radio range of the Local Target Readout.
- There can only be one Backup Readout configured to copy data from a Local Target Readout.
Miscellaneous Display Messages
|
|
.
Startup Message. Lower Display shows firmware Revision Number. |
| | 3 moving dots. Wireless target is not responding to a polling request from Readout. Check ID and Channel settings. Check Target(s). |
| | 3 dashes. Target detected but the laser is not on target. Check laser. |
|
|
.
Radio channel cannot be selected because no Radio is present or detected. Standard message for R-1307C. For Models R-1307 or R-1307W, this message indicates a fault in the radio module. |
|
.
Indicates a problem with the connection to the Local Target’s Position Sensing Device (PSD). Check plugs and cable(s). |
|
.
Target ‘’ descriptor does not contain target calibration data. |
.
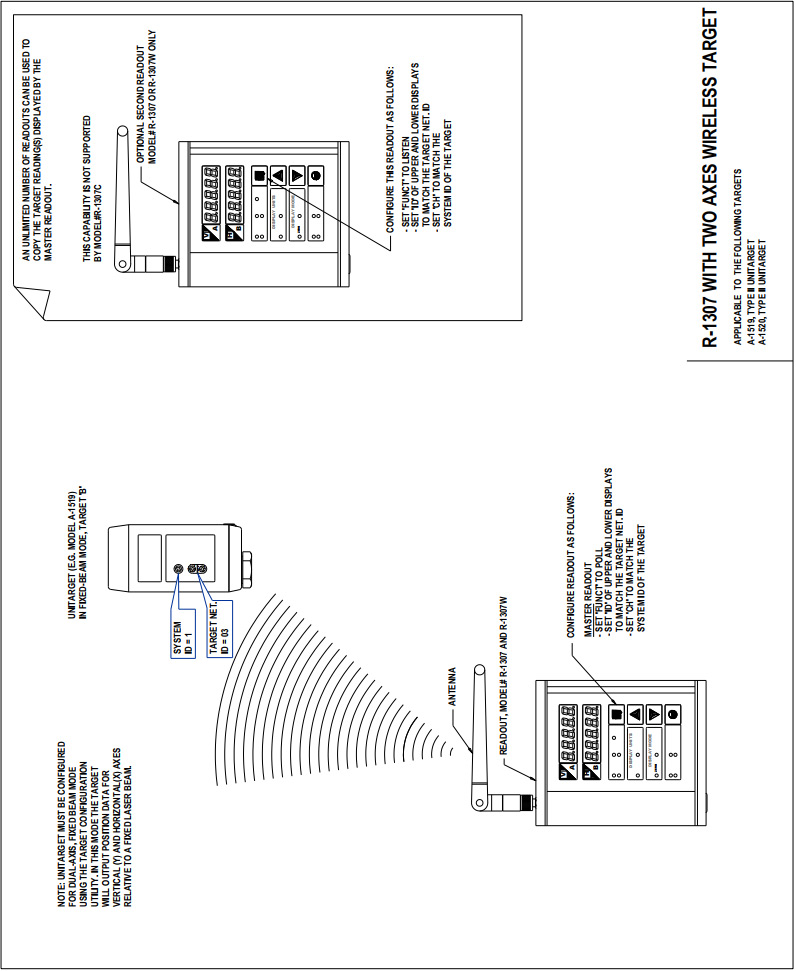
Figure 2 – Using the R-1307 with one Unitarget in Dual-Axis (fixed beam) mode
Requirements for Radio Devices
As used in this manual, a system is a collection of radio devices that have been assigned a set of common frequencies, grouped into a channel. The terms channel and System ID are functionally interchangeable.
All radio devices, for example the A-1519 and the R-1307W, need to be configured for the same radio channel in order to communicate with each other. Set all devices that are part of a system to the same channel:
- Readout: ‘setting
- Wireless Target(s): System ID switch setting.
Within radio range, or for all practical purposes within the same facility, there can only be one Master Device in ‘mode per system. This applies to any Hamar Laser radio devices, including the R-1307 and R-1307W and the A-910 Radio Transceiver.
There can only be one target with the same Target Network ID per system.
Frequently Asked Questions
Q I need to read three targets simultaneously, requiring a second Master Readout. How can I read more than two targets within the same facility if there can only be one Master Device in mode per System?
A The second Master Readout and the third target must be configured to operate on another Radio Channel or System ID. For every two targets, you will need an additional Master Readout configured to a different radio channel (see chart below).
Q My position readings are noisy. What can I do to steady them?
A First, determine why the readings are noisy. In most cases, reading noise is caused by vibration, air turbulence, or drift in the laser or target mounting structures. If possible, take steps to minimize external influences that cause reading instability. Experiment with the Dampening setting (Menu function ). Increase the number of samples to decrease reading fluctuations (note that higher number of samples results in slower response because reading takes longer to update after a change in position).
Set the display resolution to suit you requirements (Menu function . Don’t set the display to .0001″ resolution when you are working to tolerances of .001″ or more. The extra digit will only add confusion if conditions are noisy.
| Target Switch Settings | R–1307 or R-1307W Settings () | |||
| Target | System ID (CH) | Target Net ID | Master Readout 1 | Master Readout 2 |
| 1 | 01 | 01 | Upper , | — |
| 2 | 01 | 02 | Lower , | — |
| 3 | 02 | 03 | Upper , | |
Appendix A – Replacing the Battery in the L-700 Laser
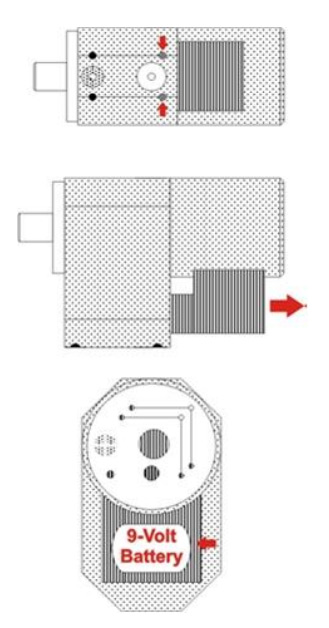
The L-700 Lasers use a standard, replaceable 9-volt battery for up to 8 hours of continuous use. For best results, use alkaline or rechargeable Nickel-Cadmium (NiCad) batteries.
To install or replace the battery.
- Remove the battery cover.
Using the 3/32” hex key included with the laser, loosen the two hex screws on either side of the bubble level. The screws do not need to be removed.
- Slide the cover out.
Pull the cover straight out of the laser to access the battery.
- Replace the battery.
Remove the battery (rock it gently from side to side to disconnect it) and replace it with a new 9-Volt battery. Make sure the battery is seated in the clips. If the battery won’t snap in, check to see if the clips are bent or distorted.
- Slide the cover on and tighten the screws.
