KnowledgeBase

Microsoft Pauses Windows 10 October 2018 New Release Version 1809

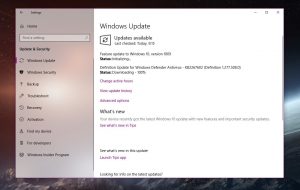
The Version 1809 Update has been withdrawn.  If it’s pending here’s how to abort it: 

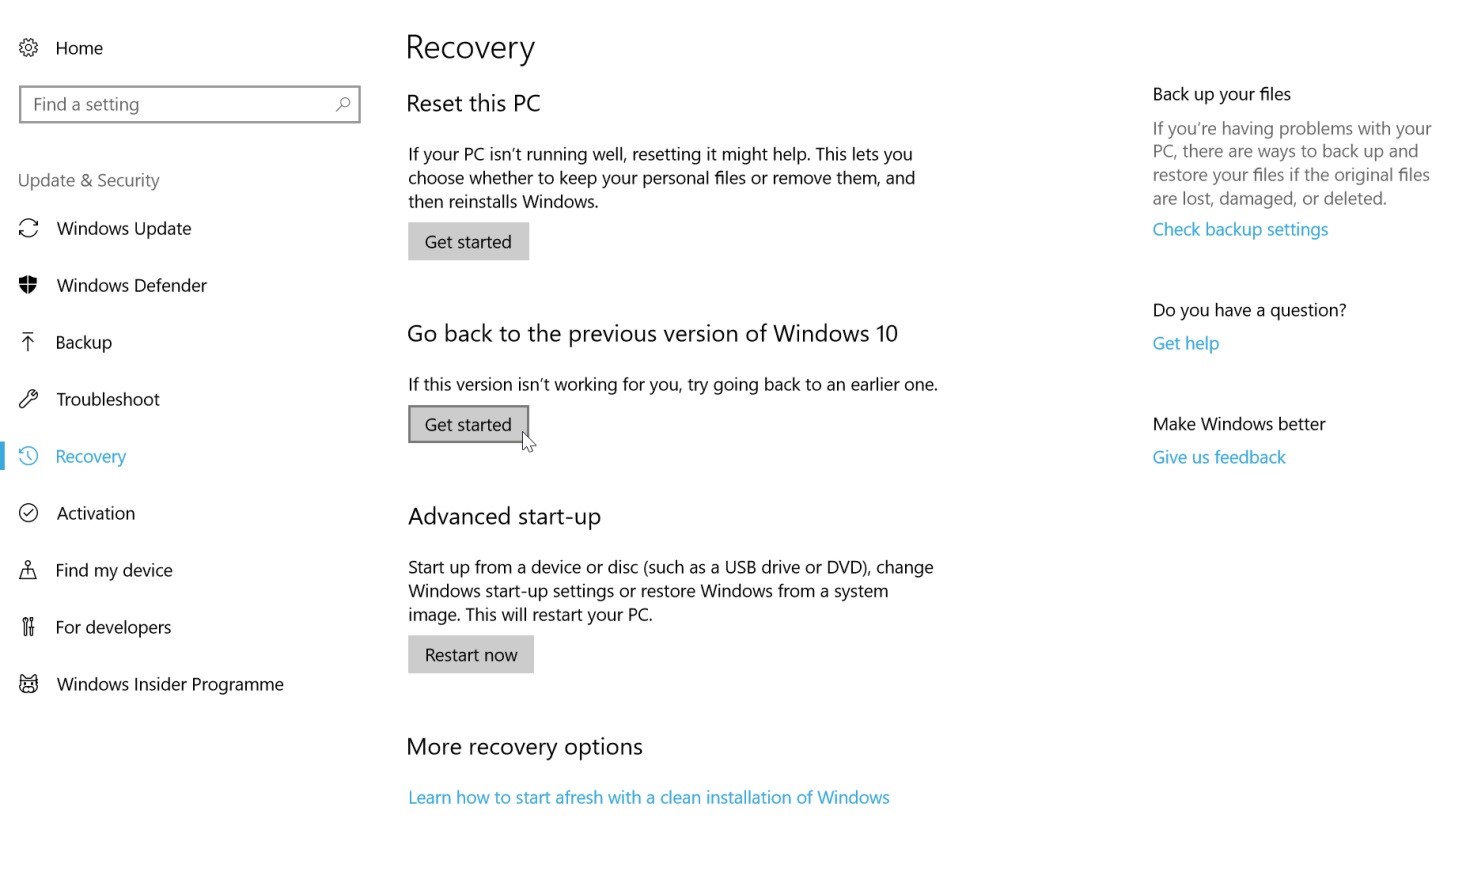
If you have it installed you can roll it back if it’s causing problems at Settings > Update & Security > Recovery, or wait for corrective Updates to be pushed to solve reported issues.

How to Cancel Pending Installation of Windows 10 Version 1809


One of the issues caused the update to remove certain user files (e.g. users documents folder) during the upgrade, and although it’s not known how widespread it is, it was critical enough to convince Microsoft to suspend the rollout.

In the meantime, Microsoft recommends users to stay away from Windows 10 version 1809, as it’s still conducting its own investigation to determine the cause of the bug. This means the company can’t yet tell for sure which devices are affected or not, so it’s better not to install the update until a fix is shipped.

Microsoft has already pulled all download options for the October 2018 Update, including the manual download via Windows Update, the Media Creation Tool, and the stand-alone ISO, but it goes without saying that there still are other ways to install it.

Microsoft recommends users to cancel the pending update by all means until a fix is offered. While I think that you can actually update if a backup is created, canceling the pending update is probably the best way to go.


How to cancel the pending update

And while this is the recommended solution, there’s no easy way of doing it. In fact, canceling an update isn’t a straightforward workaround either, and there are several ways to do this thing.

Basically, the easiest way is to remove all the downloaded update files. Typically, this causes the update to re-download, but since Microsoft no longer offers it on its Windows Update servers, this isn’t the case this time. So once you delete the files, nothing would be downloaded afterward, with Windows Update telling you that the computer is fully up to date.

Deleting the downloaded update files is easy. Just browse to the following location and delete all folder contents:

C:\Windows\SoftwareDistribution\Download

Note that the path could vary if you have installed Windows on a different drive, so replace C: with the corresponding letter.

There are more ways to do it. One of them, if you’re running Windows 10 Pro, is to configure update deferral in Settings > Update & Security > Windows Update. When you set up the feature, the pending update is automatically canceled, and then your system displays an up-to-date notification.

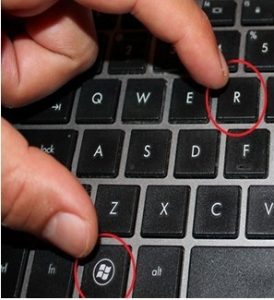
Furthermore, it looks like restarting the Windows Update service does the magic too. To do this, you first need to launch the services manager by typing

in the Start menu or the Windows key + R  (run) dialog. 

Look for Windows Update, double-click the entry and then press Stop. Wait for a couple of seconds and then Start the service again. Windows Update should then scan for new updates once again, ignoring the pending installation and then displaying a notification that your system is up to date, as no data is available for download from Microsoft.

As for the ETA regarding Microsoft’s fix, there’s no confirmation in this regard, as work in still in progress on a resolution. Most likely, the software giant will begin the automatic rollout via Windows Update tomorrow, but exclusively to the systems where it can guarantee flawless experience.

How to rollback and uninstall Windows 10 Fall Creators Update

The Windows 10 Fall Creators Update is rolling out to users. If you install it and encounter major problems, as some users have (especially owners of Razer laptops), you might want to go back to your previous version, and wait until the update is a bit less buggy.

If you been using Windows 10 for a while, you’ll probably know how to do this, although the process may be slightly different to what you’re used to.

To uninstall the Fall Creators Update, go to Start > Settings and click on Update & Security.

Click the Recovery link on the left and then click on Get started under ‘Go back to the previous version of Windows 10.’

Provided you haven’t yet cleared up all the space used by the update, the rollback process will start.

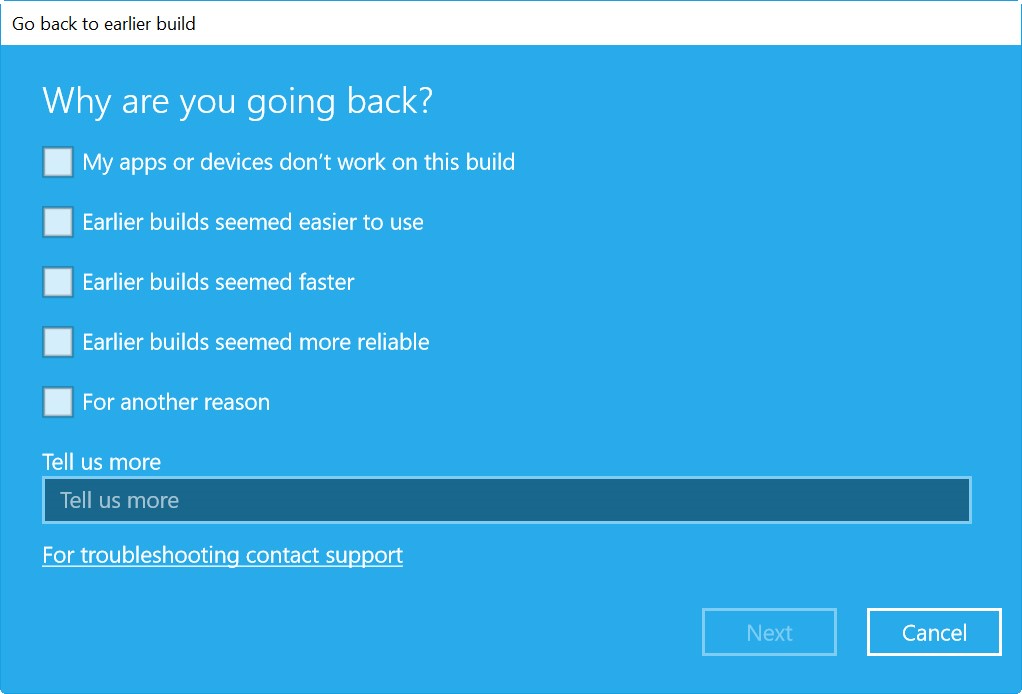
You’ll now be asked why you are going back to the previous build.

You can select from:

  • My apps or devices don’t work on this build
  • Earlier builds seemed easier to use
  • Earlier builds seemed faster
  • Earlier builds seemed more reliable
  • For another reason

You need to select a reason for the Next button to appear, and can also opt to tell Microsoft more about your reasons if you wish.

Bear in mind, if you do revert to a previous build you may need to reinstall some apps and programs, and you will lose any changes you made to Settings after installing the Fall Creators Update. You’ll also be advised to backup your files as a precaution.

Before you do go back to the previous version you’ll have the option to check for updates, just in case the problem(s) you’re encountering have since been fixed.

If you’re sure you want to remove the Fall Creators Update, click on the Go back to earlier build button and the rollback will begin. Just sit back and wait.

How to turn off Wi-Fi in Windows 10

CONTENTS:


OPTION ONE

To Turn On or Off Wi-Fi from Wireless Network Icon on Taskbar

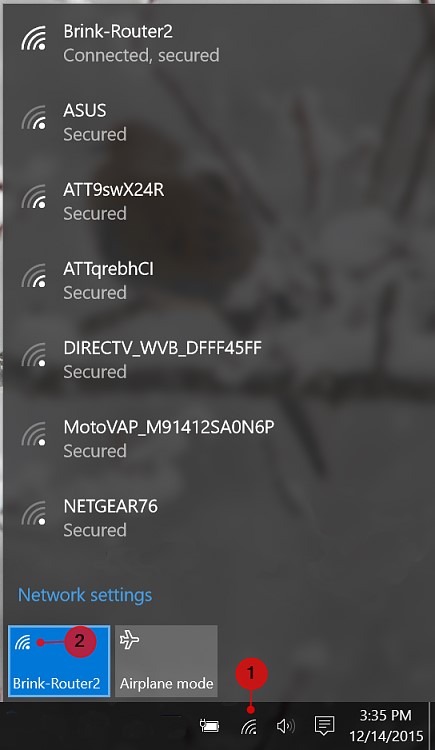
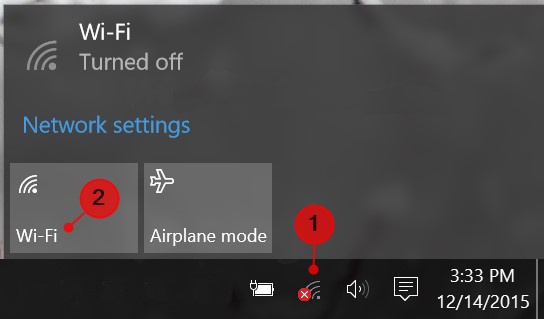
  1. Click/tap on the wireless networksystem icon on the taskbar notification area. (figure 1)
  2.  Click/tap on the Wi-Fi action button to toggle on or off. (see screenshots below) (figure 2)

Figure 1  Wi-Fi action button
 Figure 2  Wi-Fi action button
 

OPTION TWO

To Turn On or Off Wi-Fi in Action Center

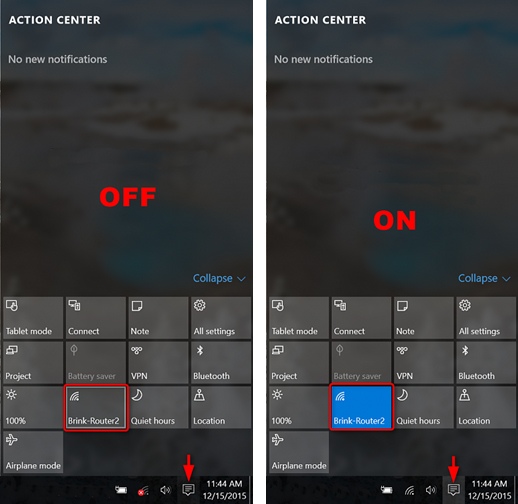
Starting with Windows 10 Insider Preview Build 14328, the Wi-Fi Quick Action directly takes you to the “View Available Network” flyout instead of turning ON/OFF your Wi-Fi.

  1. Open Action Center(Win+A).
  2. Click/tap on the Wi-Fi quick action button to toggle on or off. (see screenshots below)


OPTION THREE

To Turn On or Off Wi-Fi in Wi-Fi Settings

  1. Open Settings, and click/tap on the Network & Interneticon.
  2. Do step 3 (on) or step 4 (off) below for what you want to do.
  3. To Turn On Wi-Fi
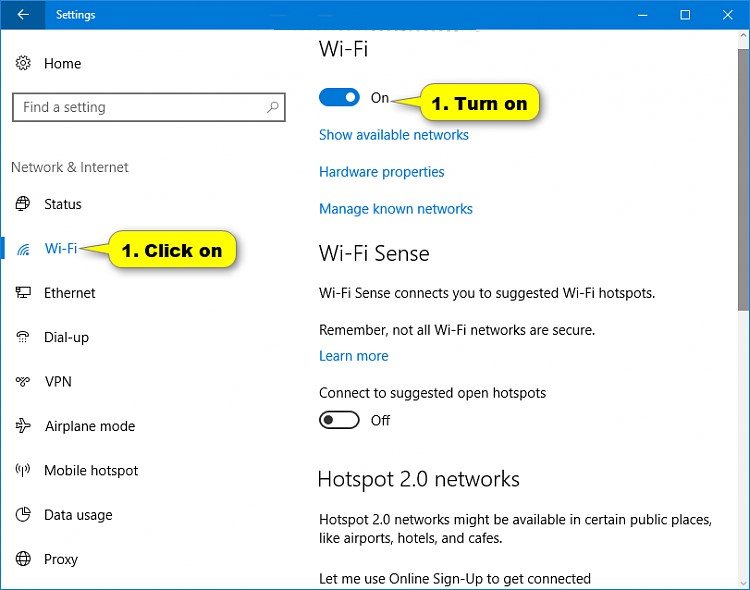
    1. Click/tap on Wi-Fion the left side, turn on Wi-Fion the right side, and go to step 5 (see screenshot below)
  4. To Turn Off Wi-Fi
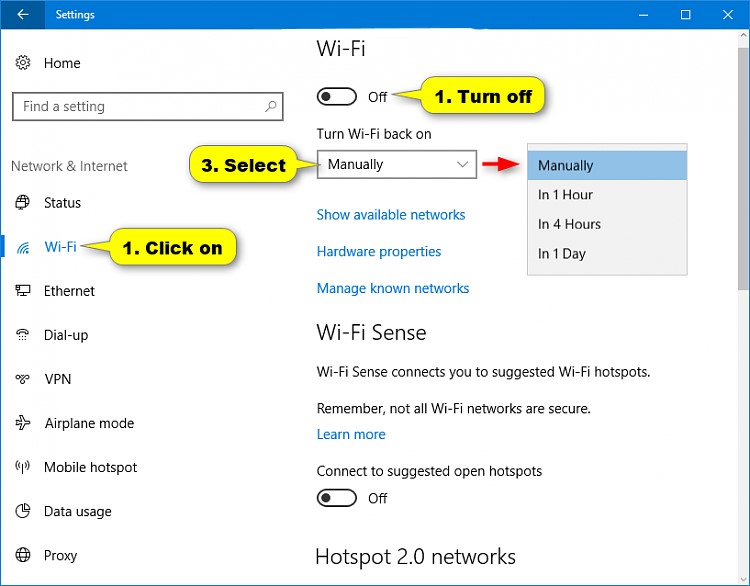
      1. Click/tap on Wi-Fion the left side, turn off Wi-Fion the right side. (see screenshot below)
      2. Select when to Turn Wi-Fi back on, and go to step 5 (see screenshot below)

  5. When finished, you can close Settings if you like.


OPTION FOUR

To Turn On or Off Wi-Fi in Airplane Mode Settings

    1. Open Settings, and click/tap on the Network & Interneticon.
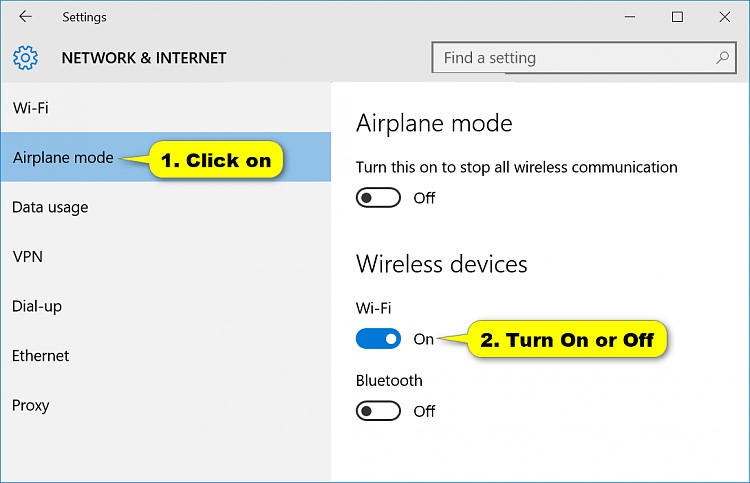
    2. Click/tap on Airplane mode on the left side, and turn on or off Wi-Fi on the right side. (see screenshot below)
    3. When finished, you can close Settings if you like.

Windows 10 Fall Creators Update version 1709

There are two known effects of the Fall Creators update regarding Bluetooth:

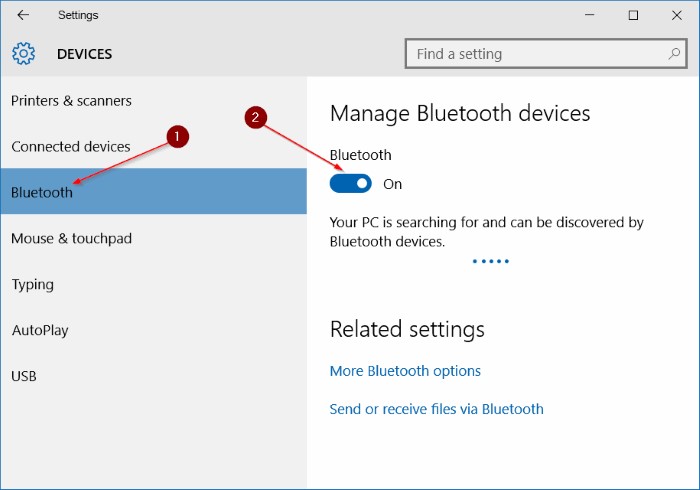
  1. The Bluetooth pairing of the Hamar target loses its connection and will need to be paired again. When clicking/tapping on Start > Settings > Devices > Bluetooth(1), if the Bluetooth on/off toggle(2) is no longer visible then you will need to rollback Windows to version 1607.


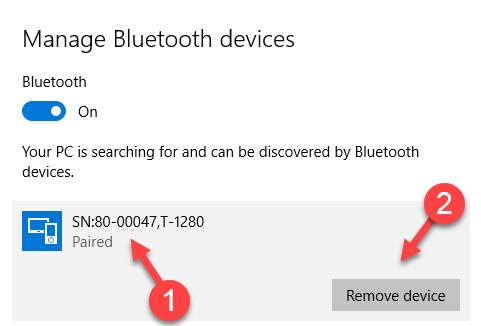
  1. If the Bluetooth toggle is visible, then your target pairing needs to be reset. Locate your previously paired target device, using stylus or finger, tap on target (target is listed by its serial number)


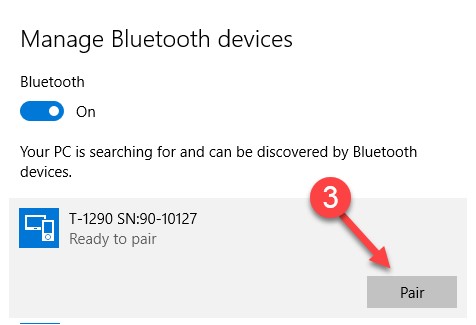
  1. Turn target on allowing Bluetooth in tablet to discover target, once the target is displays “Ready to pair” tap on the Pair button. Enter passcode 1280 to complete target pairing.
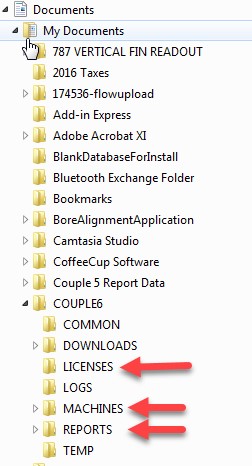
  2. If Windows no longer displays the on/off Bluetooth toggle you will need to rollback the windows Operating System: IMPORTANT NOTE: Before rolling back Windows users MUST copy their data from the COUPLE6 directory or will lose ALL Machines and Reports!
    1. Using a flashdrive, copy the following folders from the COUPLE6 folder to a flashdrive:

Windows Mobile Device Center No Longer Working in Windows 10

There seems to be two things that have happened with the new Creator update for Windows 10. The first issue has to do with the local services account. It seems some permissions have been removed that the Windows Mobile Device Center needs to function. This is a two part fix. The first is that the Windows Mobile Device Center needs to be updated with either a domain or local administrator account to run the service. This can be performed through the log on tab in the service properties. The second is listed below with a nice introduction as to what was broke:

The creators update has a new feature, related to svchost.exe: the services will not share by default the same svchost.exe, even they are assigned to be run within of the same group with -k option.

Rapimgr and Wcescomm (Windows Mobile-based device connectivity and Windows Mobile-2003-based device connectivity) are such services: they are defined to be started in the same shared svchost.exe (-k WindowsMobile). RapiMgr creates a kernel semaphore AS_ACCEPTANCE_SEMA, because it starts first. WcesComm tries to do this too, but fails: the semaphore has been already created and should be only opened. This will fail: not enough permissions (remember: two different svchost.exe, different SID, etc). So, wcescomm is just stopped.

The fix is simple: add SvcHostSplitDisable to the both services RapiMgr and WcesComm:

REG ADD HKLM\SYSTEM\CurrentControlSet\Services\RapiMgr /v SvcHostSplitDisable /t REG_DWORD /d 1 /f

REG ADD HKLM\SYSTEM\CurrentControlSet\Services\WcesComm /v SvcHostSplitDisable /t REG_DWORD /d 1 /f

Both services should have the same Local Service Account. You have to reboot after this change.


Note: This fix requires updating of your Registry. We recommend having your IT group implement these changes for you.

How to Install and run Plane5 under Windows7

Plane5 may have problems accessing certain folder(s) under Windows 7. To prevent his from occurring please install and configure Plane 5 as follows:

  1. Install Plane5. Note: Click ‘IGNORE’ if you get an error message related to msimg32.dll during the installation.
  2. From the Windows Start Menu: click on All Programs
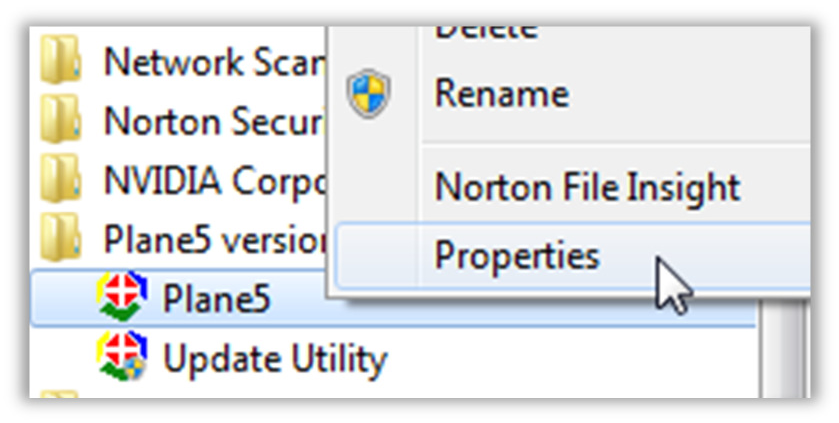
  3. Locate the Plane5 version II folder and click on it to list the contents: Plane5 and Update Utility shortcuts.
  4. Right-click on the Plane5 shortcut and then select Properties from the pop-up menu, as shown in the adjacent image. Note: Other items in your programs menu will differ.
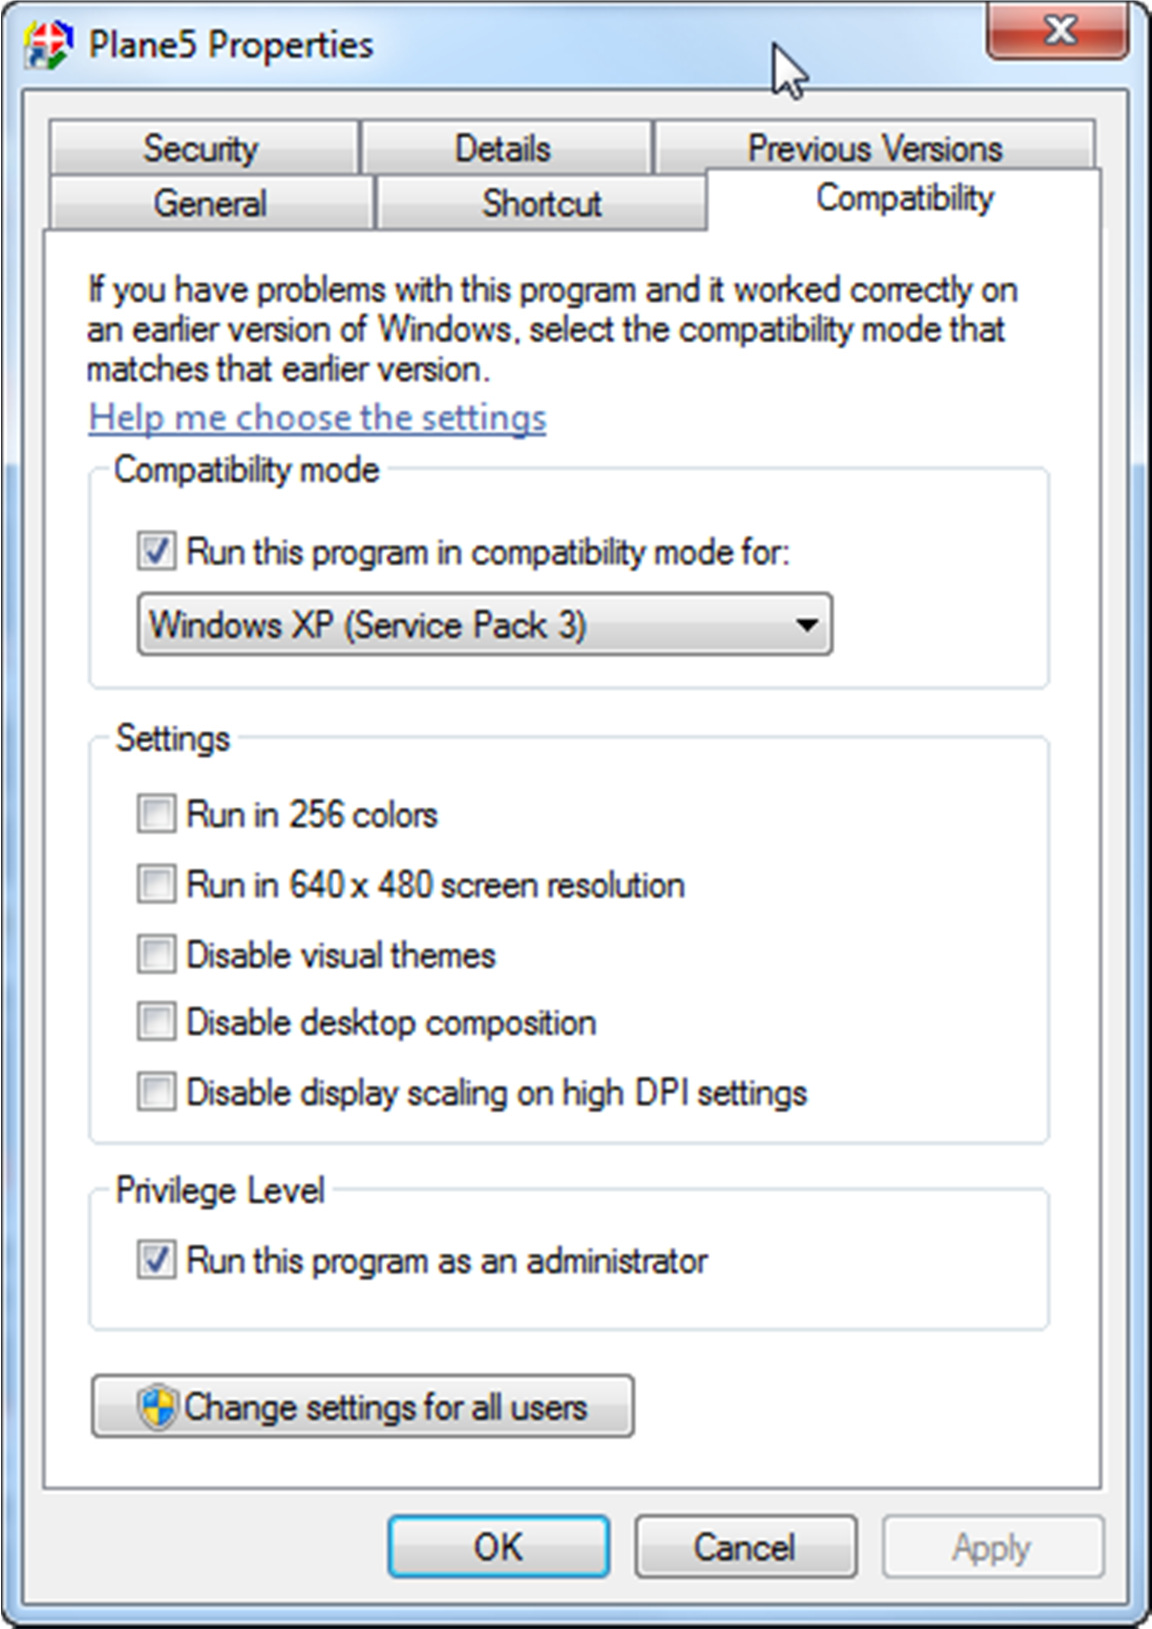
  5. The Plane5 Properties will appear. Click on the Compatibility tab
  6. Check and set the following options:
    1. Run this program in compatibility mode for: Windows XP(Service Pack 3)
    2. Run this program as an administrator.
  7. Click ‘Apply’ to save settings.

How to Setup Windows Mobile Device Center/ActiveSync

Windows Vista/Windows 7 – Windows Mobile Device Center Setup

  1. Figure 1 – Windows 7 installing (WMDC)

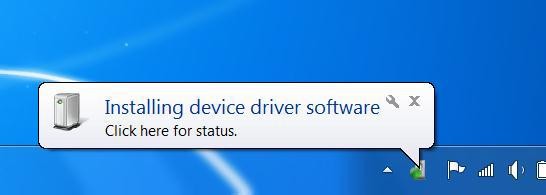
    If your computer uses the Windows 7 operating systems, the required software Windows Mobile Device Center (WMDC). If your computer runs an earlier version of Windows such as Windows XP, you will need to install Windows Activesync. Plug your PDA into your PC and Windows 7 PC will automatically begin installing the drivers and (WMDC) software. (figure 1)

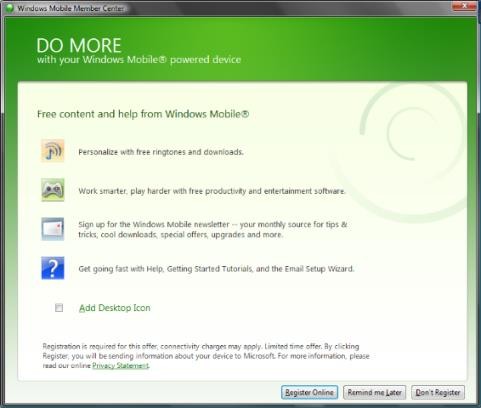
  2. If this screen appears, click the Add desktop Icon, and then click Don’t Register.
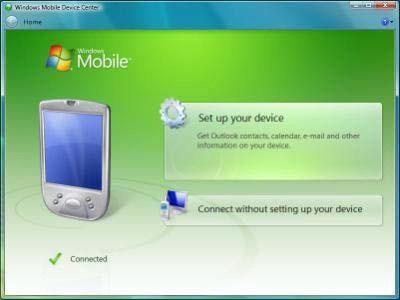
  3. Click on Set up your device.
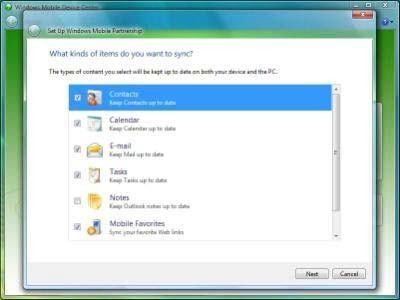
  4. Uncheck all boxes, except for Files. Click on Next.
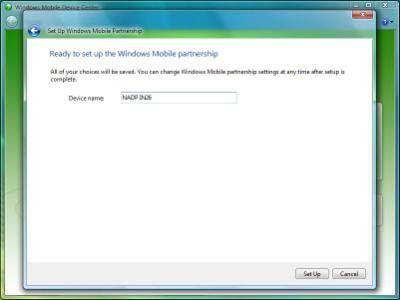
  5. Give your device a descriptive name. Then click next. You will be shown a progress page during the time it takes for the partnership to be established.
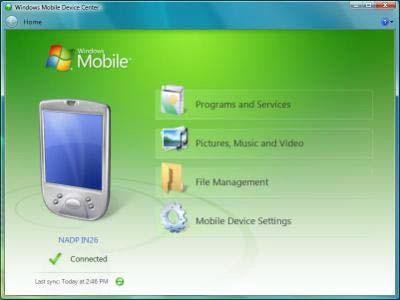
  6. When you see this screen, the partnership is established.

Transferring data from PDA to PC using
Windows Vista/Windows 7 – Windows Mobile Device Center

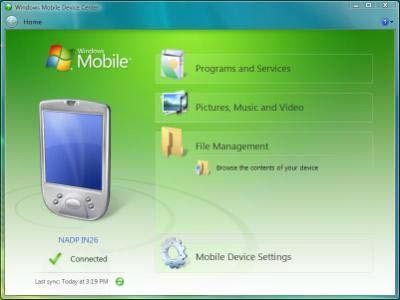
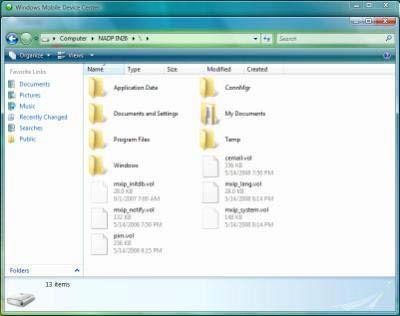
  1. Connect the PDA to the PC using the Sync cable. Open Windows Mobile Device Center (WMDC) by clicking on the desktop icon. Wait for the WMDC screen to show that the PDA is connected. Click on File Management, and then on Browse the contents of
    your device.
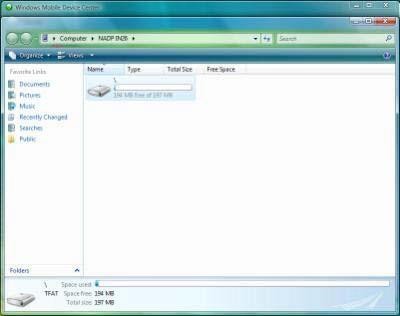
  2. Click on the icon representing the virtual drive of the PDA.
  3. Click on the corresponding Software folder to access the files needed.

Running Couple6 as Administrator in Windows7, Windows 8 & Windows 10

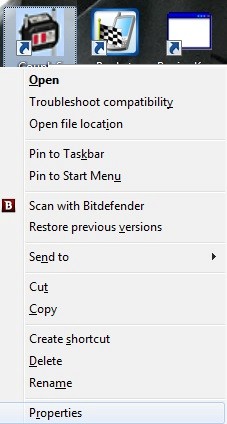
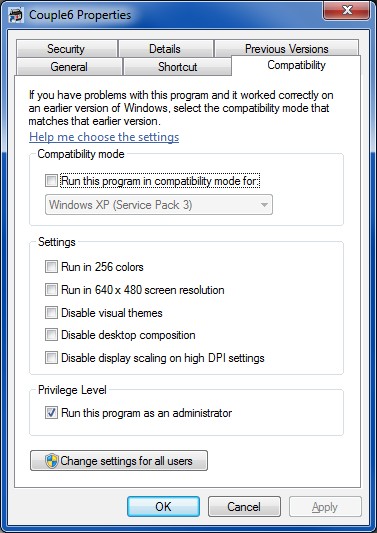
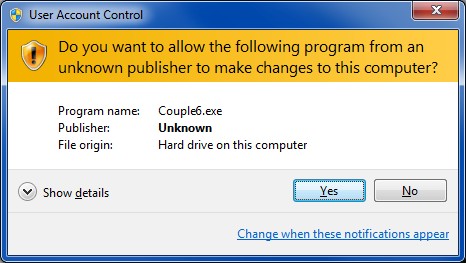
Couple6 needs Administrative Rights to Read/Write in specific folders, below is the steps to set Couple6 to run as administrator.

  1. Right click on the Couple6 icon and Select Properties
  2. Click the Compatibility Tab and under “Privilege Level”, check the box to ‘Run this program as an administrator
  3. When Couple6 starts, you will be prompted with a User Account Control pop-up box, Select “YES” to allow Couple6 to open.

Connecting Bluetooth devices to Windows 7,8,10

Contents

How to setup Bluetooth device pairing with Windows 7

Step 1: Plug in the USB Bluetooth dongle if you don’t have Bluetooth build in


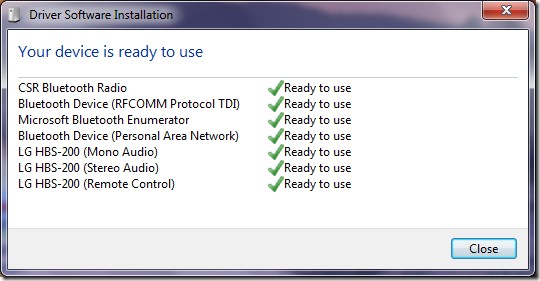
After you’ve plugged in Windows will automatically find the right driver for you. As you can see here the driver is successfully installed.

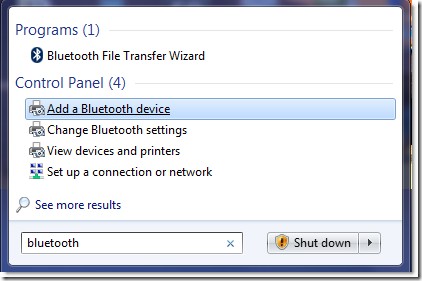
Step 2: Click on the START button and Type “Bluetooth” in the start menu

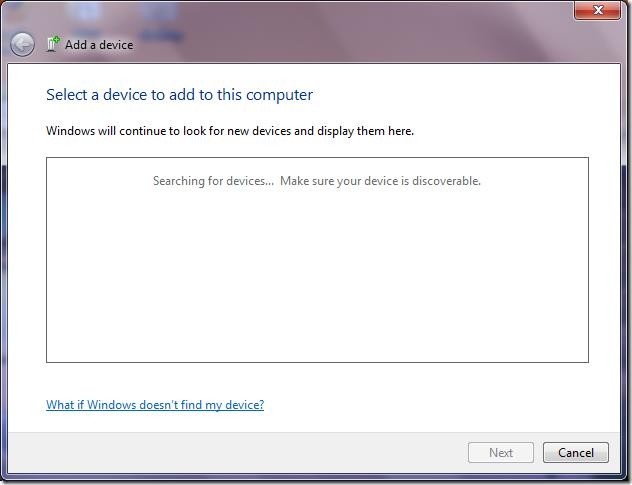
Step 3: Click on Add a Bluetooth device, in the meantime, make sure your Target is turned on.

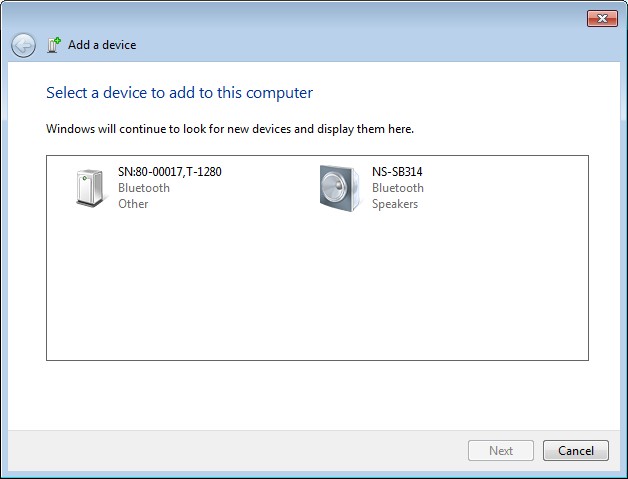
Windows will automatically search for your device. Your Target should appear, as shown in the example below SN:80-00017, T-1280, click on the device to highlight it and click Next to proceed.

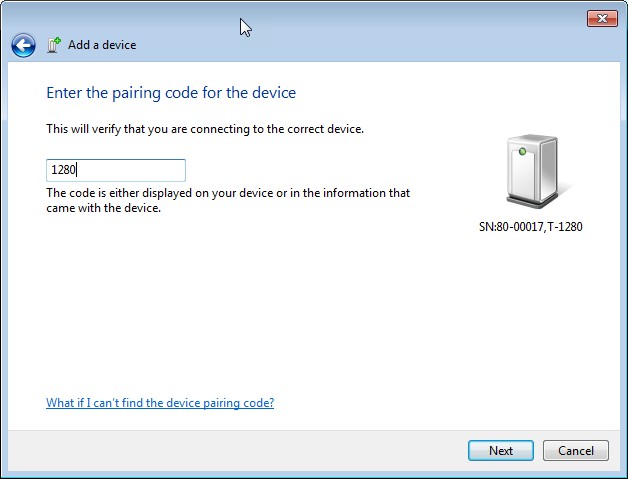
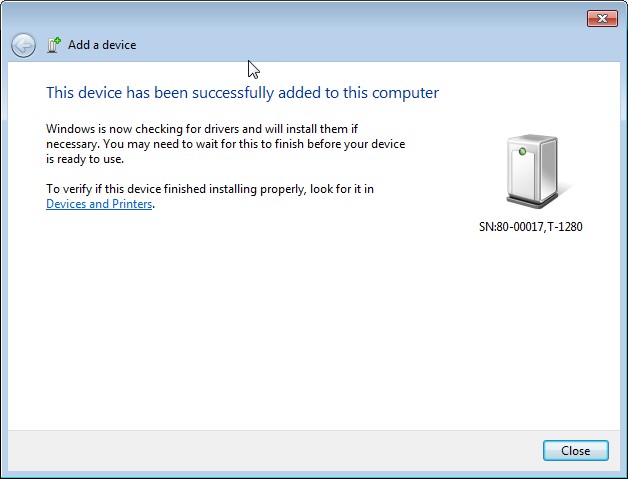
Step 4: Enter the passcode 1280 that’s the default for all of the Hamar Lasers Stealth targets. Click next to proceed.

Windows 8 and Windows 8.1 – Bluetooth Pairing

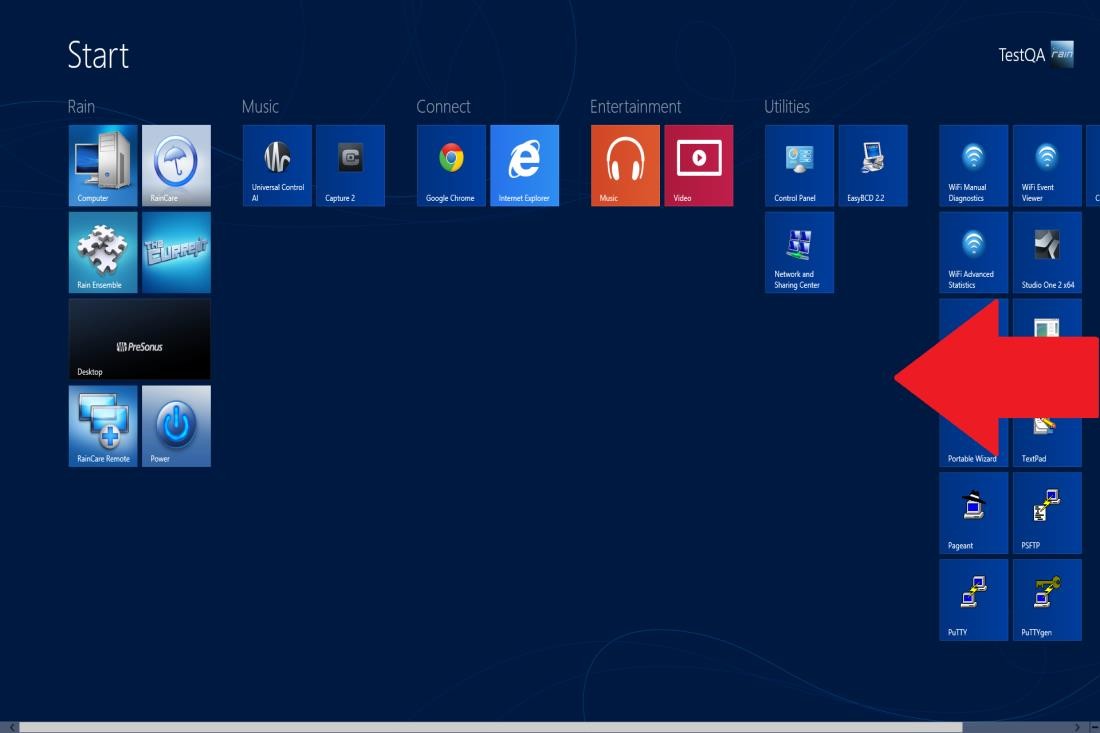
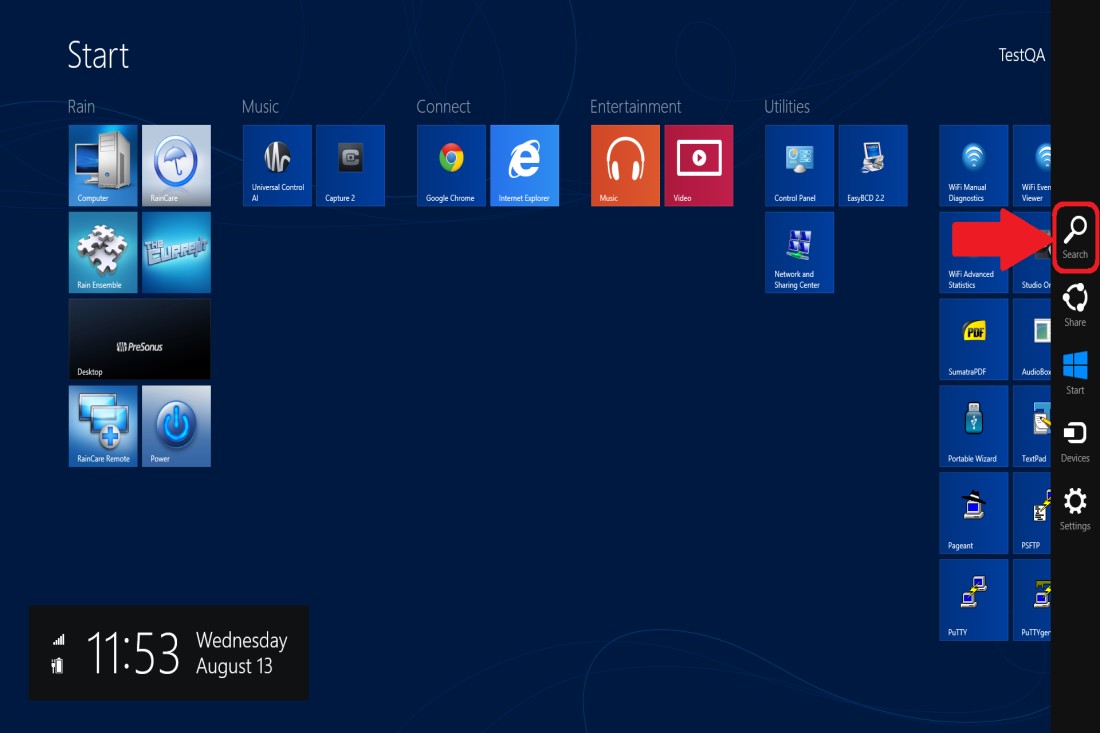
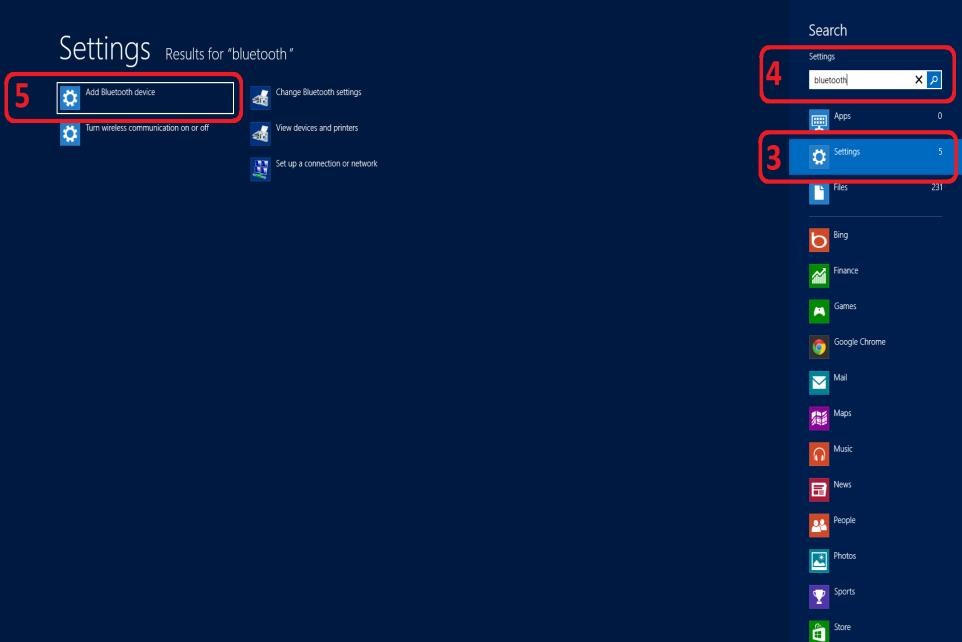
1. From the main screen, swipe the right side of the screen in the direction of the red arrow to open the options panel with shortcuts to the Apps, Settings, and Start page.

Windows 8 and 8.1 users that do not have a touch screen, move your mouse cursor to the right edge of the screen to open the options panel.

2. Select the Search icon (looks like a magnifying glass).

3. In the option panel below the Search field, select the “Settings” icon.

4. In the upper right, under Settings, is a text box; type “Bluetooth”.

5. In the left column, select “Add A Bluetooth Device.”

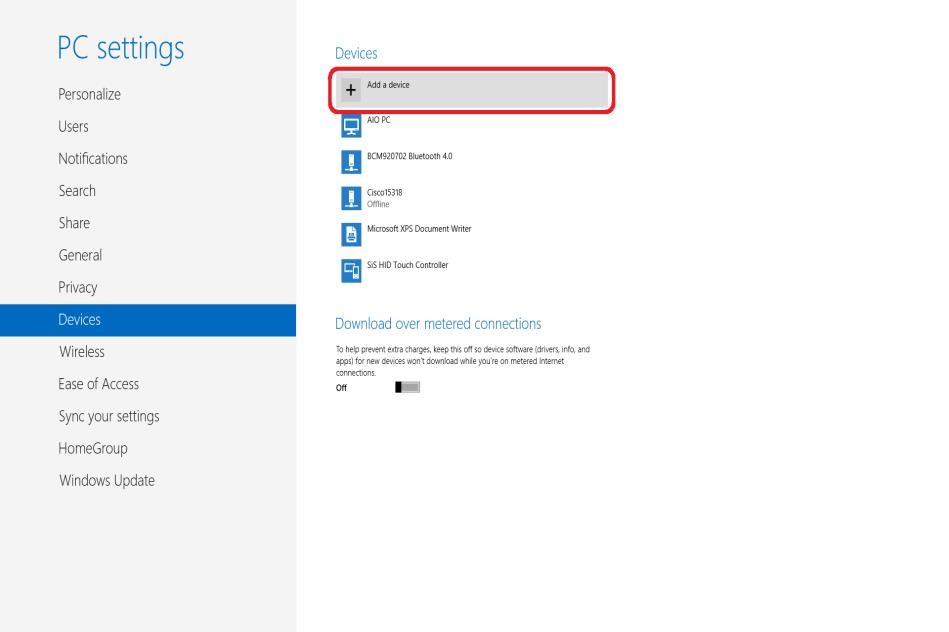
Click “Add Device” at the top of the Bluetooth device list to look for your Hamar target (serial number listed).

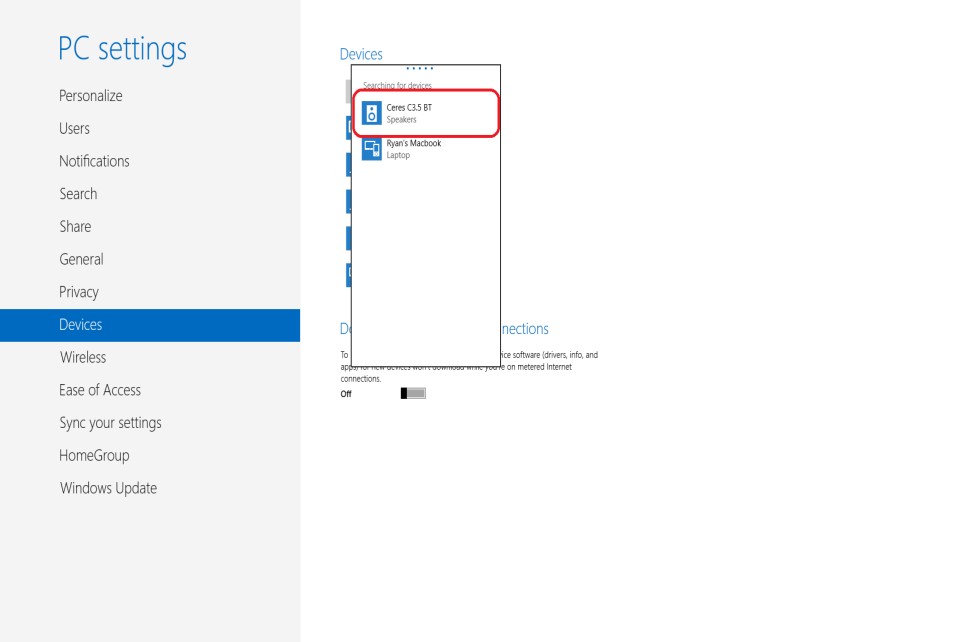
7. In the Bluetooth device list select the Serial Number listed on the back of your Hamar target

8. You will be prompted for a passcode, enter 1280. It will take a few moments to establish a connection.Then you will see a blue progress line as Windows finalizes the Bluetooth pairing connection.

9. Once complete, the Bluetooth device list will show the Model number of your target along with the Serial Number.

Connecting Bluetooth devices to Windows 10

1. For your computer to see the Bluetooth peripheral, you need to turn it on and set it into pairing mode. It typically involves pressing and holding the Bluetooth button until you see a flashing light that indicates the pairing is ready.
2. Then Tap on Start > Settings.
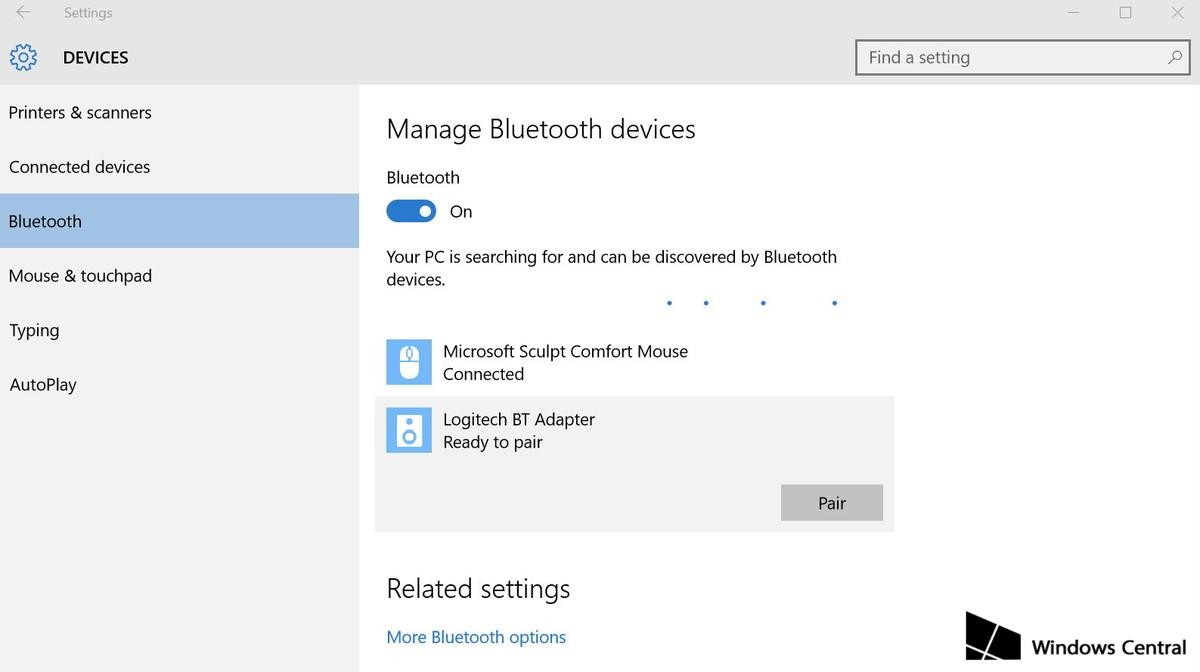
3. Navigate to Devices and go to Bluetooth.
4. Make sure the Bluetooth switch is in the On position. (You’ll know it is working because you’ll notice the message that reads “Your PC is searching for and can be discovered by Bluetooth devices.”)
5. Select the device you want to connect and click Pair.

6. Enter 1280 for the passcode when prompted. Your Target is now paired and ready to be used. Exit Settings window.

How to Change COMPort Setting in Windows XP, 7 & 10

Changing COMPort Setting in Windows XP

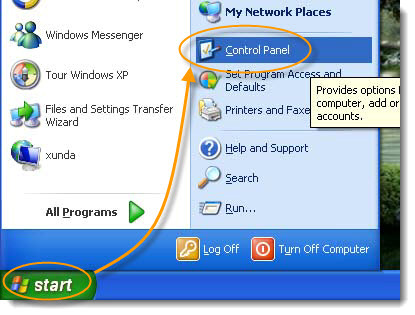
  1. Click on the Start Button.
  2. Select Control Panel.
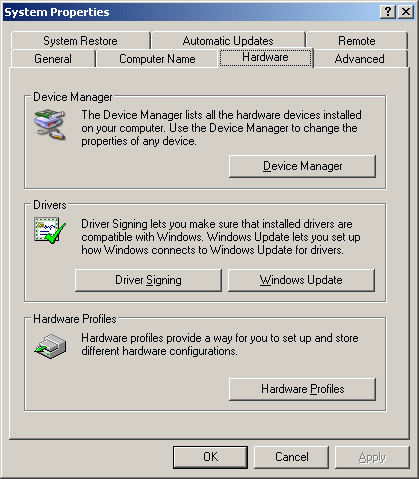
  3. Double click on the System Icon, in the System Properties window, select the Hardware Tab.
  4. Open Device Manager
  5. Double-click Ports (COM & LPT).
  6. Right-click the port for which you want to change settings, and then click Properties.
  7. On the Port Settings tab, Click on the Advanced button.
  8. Under The Com Port Number Selection, Select COM1 (if it is In Use), still select it and select OK.
  9. If Com selected was in use, User will receive a pop up “Com name is being used by another device (such as another com port of modem) using duplicate names can lead to inaccessible devices and changed settings. DO you want to continue? If user knows there is nothing else running, there will be no conflict. If unsure, keep the setting at COM1, the A-910-2.4ZB plugged in and reboot the PC. The A-910-2.4ZB will retain the COM1 assignment.

Changing COMPort Setting in Windows 7

  1. Click on the Start Button
  2. Right click on Computer or My Computer, if you have the option to click on Manage do so. If not, select Properties and on the left side of the screen, select Device Manager.
  3. In Device Manager, do the following:
    1. Expand the Ports ‘(COM& LPT)’
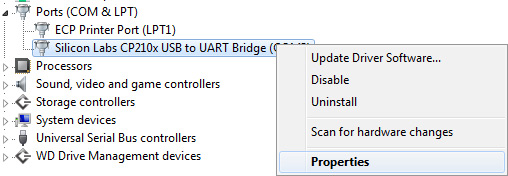
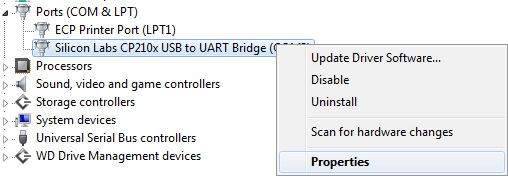
    2. You should be looking at something like this:
  4. As you can see Windows has set the port to COM3.. Let’s change that: Right click on the device and click on ‘Properties’.
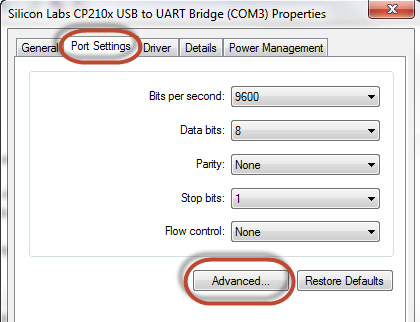
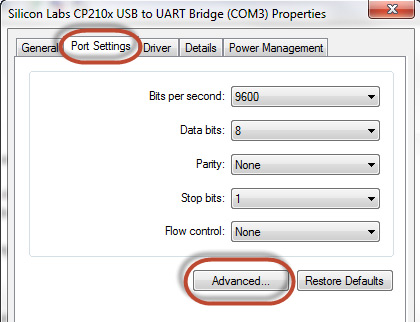
  5. Click on ‘Port Settings’. Then click on ‘Advanced…’.
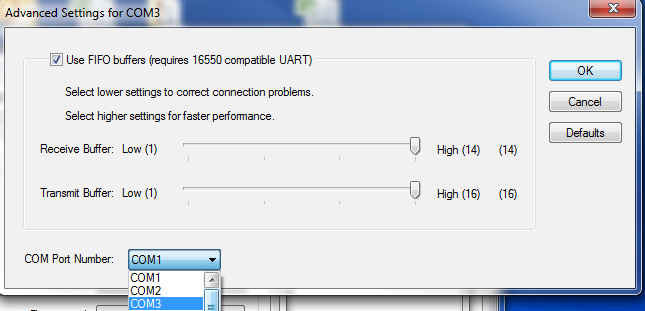
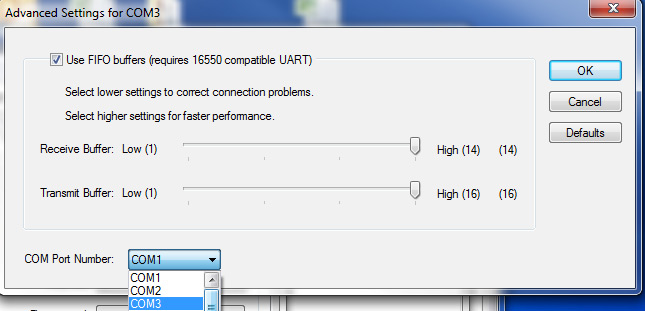
  6. Once you’re in ‘Advanced Settings for COM3’ on the bottom you can see the ‘COM Port
    Number: COM3’. Click on that to change it to COM1.
  7. Then click ‘OK’ on all open Property Windows.
    Now the device should look like this:

Changing COM Port in Windows 10

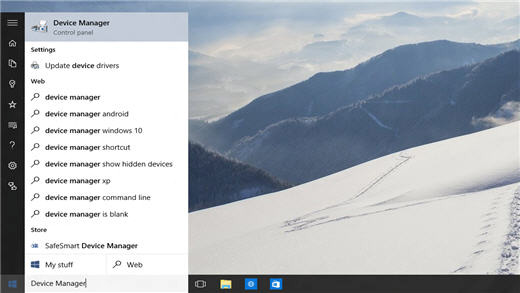
  1. Open your Start Menu and just type in Device Manager, and it will come up.
  2. In Device Manager, do the following:
    1. Expand the Ports ‘(COM& LPT)’
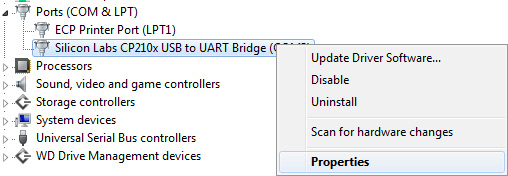
    2. You should be looking at something like this:
  3. As you can see Windows has set the port to COM3.. Let’s change that: Right click on the device and click on ‘Properties’.
  4. Click on ‘Port Settings’. Then click on ‘Advanced…’.
  5. Once you’re in ‘Advanced Settings for COM3’ on the bottom you can see the ‘COM Port
    Number: COM3’. Click on that to change it to COM1.
  6. Then click ‘OK’ on all open Property Windows.
    Now the device should look like this: